Monday, November 1, 2010

Knockoff Wood Locker Cabinet + Some

It's been five months since I last posted.  I haven't stopped crafting and creating - life just got crazy.  Suddenly having two kids in school makes for a busy life.  Not to worry, though.  I get antsy when I can't make things, so there'll be new projects in the future.  Meanwhile, would you like a look at my latest woodworking success?


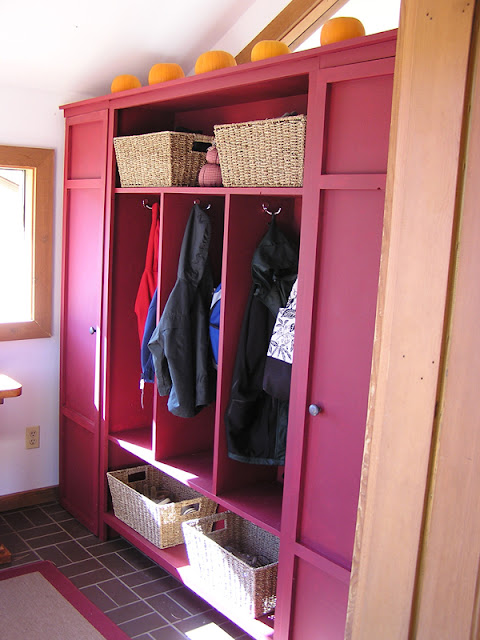
You might remember how much fun I had making the picnic table with plans from Knockoff Wood.  I was so pleased with the way that the table came out, and with my new found carpentry confidence, I figured I could tackle something a little more complicated.  So this time, I discovered Ana's plans for the Locker Cabinet.  I loved the look of her cabinet that she created for her entryway.  The only problem - it didn't fit exactly like I wanted it to.

So I pulled out my trusty tape measure, my pencil and my graph paper, and set to work altering the plans and creating my own plans for two matching "closets" that would flank the ends of the locker cabinet.  First I reworked Ana's plan to make the locker cabinet taller.  As you can see from the photos, I have an oddly shaped window in my entryway.  It looks out onto a sunroom that was added after the house was built.  It's not a pretty view, and although I like the extra light in the entryway, I knew that I could cover the less-than-desirable view while still getting ample light from the window.

Next, I needed two closets.  We live in a house with no coat closet and no broom closet.  Although the lockers solved the problem of where to put our coats, hats, boots, etc., the unit didn't solve my problem of where to put my vacuum, mops, etc.  I was so tired of tripping on them everytime I went into the bedroom closet to change my clothes.  So I whipped up some designs for two tall, skinny cabinets that could attach to the locker unit.  Thanks to Ana's plans for an armoire, I was able to design some doors that I liked for the closets.  I spent one weekend building the three pieces: one locker cabinet and two closets.  I spent the second Saturday priming, painting and attaching the pieces together.  With a final piece of trim across the top, the unit looked like it was designed as one.  Don't you just love the red paint.  The color is called Cherry Chocolate - sound yummy, doesn't it?  It looked like pink nail polish while it was going on, but it dried to a nice dark shade of red.  Love it!!


And here's the new closet that hides my vacuum.  I made adjustable shelves for the closet on the other end.  This is where I stash my extra paper towels, cleaning supplies and more.


What a rewarding way to spend a couple of weekends.  As usual, many thanks to Ana for the inspiration!

Wednesday, June 2, 2010

Easy Photo Vignettes

Professional photographers know just the right combination of lenses, light and, of course, post-processing magic to take a photo from good to amazing.  Take this photo for example taken by my friend, Kiera.  By the way, if you live in the Indianapolis area, I would highly recommend you give Kiera a call.  She is, in my opinion, an amazing photographer and I can't wait for her to shoot our family photos in August.

Anyway, see the subtle shading around the edges of the photo that helps focus the viewer's eyes on the bride and helps to further the magical effects of dusk crowding in around this beautiful bride?  As I said above, Kiera does all this through the magic of her camera (and maybe a little help in post-processing.)


I, on the other hand, don't know enough about photography (yet) to achieve this effect naturally.  So I turn to the magic of Photoshop.  In a few seconds, you can achieve a similar (albeit not quite as dramatic effect) with Adobe Photoshop.

Open your chosen photo in Photoshop.  Click "Filter." Select "Distort" and "Lens Correction."  This will open your photo in the lens correction screen.


Now you can play with the two sliders under Vignette.  With "Amount," you can choose to create a darker vignette around the photo's edges, or a lighter effect to knock out the color on a darker photo.  Use the "Midpoint" slider to adjust the location on the photo at which the midpoint of your Vignette falls.  This will allow you to control the creep of the shadow - covering more (or less) photo as you desire.  Here's a before and after comparison on a photo that I shot.  With a little color correction and a Vignette effect, you've gone from a snapshot to an old-time picture postcard:


Another example focuses the viewer's attention on my oldest son's baby blues and serious little face:


A word of warning: use this effect in moderation.  It's easy to get crazy with visual effects and lose the beauty of the original photo.  However, used in small doses, it can make some of your photos pop.  Enjoy!

Tuesday, June 1, 2010

Teacher Appreciation Gifts

I spent the weekend making Teacher Appreciation gifts for my oldest to deliver at his pre-school "graduation" today.


One of his teachers has been eyeing my felted bag all school year, but I didn't have the time to knit a pillowcase-sized tote and felt it before the end of the school year.  So, I settled for cute little lunchbags for each teacher.


I followed roughly the same pattern I modified for the oilcloth-lined bags in my April giveaway. These bags above are made with canvas that I found on sale in the Walmart fabric department.  They had quite a selection of fun canvas colors and patterns. You can barely see the red flowered pattern at the bottom of the stack of straps in the first photo.  It's the same pattern as the black and white canvas, but with the base color being red and the flower pattern done in the white. I think this would make such a cute cover for a pair of foldable directors chairs.  Hmmm...I'm feeling a new project coming on.  In fact, I think my mom has a lonely pair of directors chairs hanging out in her garage that just might be due for a makeover.


And, who doesn't love a surprise inside their spill-proof lunch totes?   A little gingham in one and some fun polka dots in the other.  I just can't get enough of the oilcloth!  Most importantly, we slipped a card inside each one with the sentiment: "These bags were handmade for you with as much love as you have shown to Alex during his two years at school.  Thank you for all that you do." A sweet and simple gift to say thanks for a job well done.

Friday, May 28, 2010

DIY Wedding Flowers

I have weddings on the brain right now. Some friends of ours are getting married on July 4th weekend in Vail, CO. The bride and I have been tossing around ideas for do-it-yourself flowers for the big day.  Here are some of the inspiration photos we've found:
All photography by Max Wanger
All photos from www.oncewed.com

Her husband-to-be owns a family baking company that's been around for over 100 years.  We thought it would be fun to find some vintage tins and boxes, line them with glass containers and use those as the centerpiece vases at dinner.

And there's something so simple and rustic about mason jars as votive holders.  I love the way the jars light up as the night of celebration wears on.  Reminds me of catching fireflies during summers growing up in the Midwest.

My friend wants to give each female attendee a single stem Gerbera Daisy to hold during the outdoor ceremony.  Don't you think an arrangement like this would be stunning? Especially a bright array of reds, yellows and oranges.


The flowers would be such a simple favor at this small wedding and make such a visual impact when grouped together on a table when guests arrive and in the hands of each guest during the wedding ceremony.  Can you imagine the ceremony photos if each of your guests was holding a blossom?


All this wedding talk makes me nostalgic for the summer 15 years ago when I was planning my own wedding.  So, I'll be spending the weekend brainstorming wedding ideas and finishing up the hand-sewn bags I'm making as teacher appreciation gifts for my oldest's preschool teachers.

Wednesday, May 26, 2010

DIY Polymer Clay Jewelry

Have you ever used Polymer Clay?  I never had until today, and let me tell you, it's addictive.  Can you believe that I made this bracelet in an hour today?


I had a 40% off coupon for Michael's Craft Store, and I used it to buy a polymer clay kit for $6.  The kit included five colors of moldable clay, a razor blade, a plastic roller, and several jewelry supplies, including french hooks for earrings, silk cord for a necklace and wire to create bracelets.


This stuff is amazing.  There's something therapeutic about kneading the clay in your hands.  My favorite part is the surprise you get when you've rolled a cane and cut the first slice to see how your design came out.  I found several websites online to give me design ideas.  This one has a fabulous list of links to tutorials for creating canes and shapes. And it's fairly inexpensive to buy individual packages of clay.  Michael's had a variety of colors.  A package the same size as the purple clay above sold for $1.29.

Here are two montages which show the steps I used to create several of the beads.  Knead a small amount of clay in your hands to warm it and make it more pliable.  Use the roller to create flat sheets on wax paper or a metal baking sheet (to prevent sticking).  Stack three colors on top of each other.  Roll the layers tightly into a cane.  Lengthen the cane by rolling it to compress the layers.  Use the razor blade to cut off thin slices.  Waste clay (or extra clay from the ends of your cane) can be rolled into a base ball.  Cover the base ball with the slices.  Roll the ball until the slices create a smooth outer layer.


I followed the same steps to create these "giraffe" spheres.  I'm calling them giraffes because I love the way the gold and white combination mimics the skin pattern on a giraffe. A tip: once you've rolled the canes, put them in the freezer for 10-15 minutes.  They will harden slightly and won't distort or flatten as much when you apply pressure with the razor blade.


Here are the beads before they went into the oven to bake and harden.  Use a toothpick to drill holes (before baking) in each bead for stringing. A tip: hold the ball steady in the palm of your hand (to prevent fingerprints on the surface of your bead), apply pressure and twist the toothpick to drill through the clay.  Poke the holes immediately after rolling your ball.  As the beads sit, they become less pliable for drilling. Remove the toothpick before baking.


Bake at 275 degrees F for 30 minutes.


Turn the beads several times during baking to avoid getting a flat spot where the bead rests on the baking sheet. The beads will harden even more as they cool.  In the foreground, you can see the flat spiral beads created by taking thicker slices off the cane and drilling side-to-side through the slice with the toothpick.


Then you can select complementary beads to string your jewelry.  I used mother of pearl beads and Stretch Magic elastic jewelry cord to create this bracelet.  The bracelet at the beginning of the post combines sterling silver beads and clear crystals with the swirl beads.


Finally, I used sterling silver beads and black jewelry wire to create the hanger through which the silk cord is strung. This pendant was created on a larger waste ball (approximately 1" in size) with slices cut from all of the different canes I made.


To make all of this jewelry, I only used about one-third of the clay provided in the kit.  I'm so excited to see what new designs I can create tomorrow. Do you use Polymer Clay in your crafting?  I would love any tips or links to tutorials that you love.  Be sure to send pictures of your own polymer creations to sara(at)thehandyhausfrau(dot)com.

giveaways

Tuesday, May 25, 2010

DIY Memory Jar :: Gift Giving on the Cheap

I've been waiting to post this project because the pictures are poor quality (sorry, Dad - thanks anyway for shooting them for me).  We forgot to photograph this gift before we gave it to my parents.  Regardless of the photo quality, the gift has been a longtime favorite of my parents.  With Father's Day just around the corner, I thought this would make an inexpensive gift from the heart for that main man in your life or in your kids' lives. The Family Memory Jar:


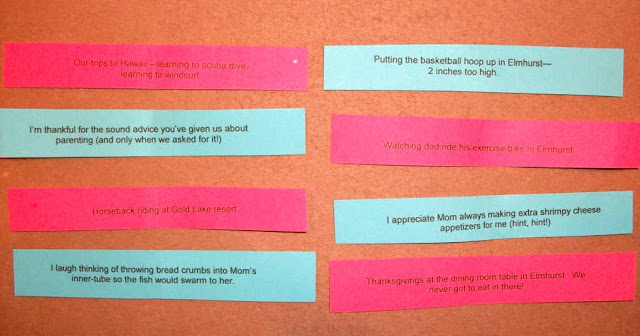
My brother and I spent some time on the phone brainstorming our favorite family memories from our growing up years. We divided up the task and each spent a week jotting down 183 memories.  I formatted them all so that each on would print out about the size of a fortune in a fortune cookie.

Some of these were memories: "I laugh every time I think about throwing bread crumbs into Mom's inner tube so the fish would swarm to her."  This was my brother.  We were snorkeling one summer, and my mom didn't want to go all the way under the water.  She was floating on an inner tube with her head poking through the center ring.  My brother thought it would be funny to throw a bunch of bread crumbs near the inner tube so that all of the tropical fish would swarm around my mom and surprise her.  Sounds kind of mean when I'm describing it, but it was actually really funny at the time.  My mom kept going on and on about how she must have some special skill in attracting fish because they were all crowded around her.  Little did she know it was thanks to the half-loaf of bread my brother was pelting her with.

Some are just sentiments: "I'm thankful for the sound advice you've given us about parenting (and only when we asked for it!)" That one is pretty self-explanatory - and really much appreciated on both counts (the advice and the only-when solicited nature of it!)


We cut them all out and placed them in a glass cookie jar with this label:


My parents chose one every day for a year and then started again the next year.  They loved reading each of the memories that meant so much to us, and my brother and I had a great time and lots of laughs putting them all together.  This would be a wonderful project to do with your own kids and surprise their dad on Father's Day.

SYS Teachers

Sunday, May 23, 2010

DIY Necklace Pendant

Today's project was an inexpensive and easy pendant that looks great on a necklace.


Ever since I saw Judikins Diamond Glaze featured in a project to turn a Scrabble tile into a necklace, I've been looking for an excuse to use it.  Diamond Glaze has become so popular, however, that it was sold out in every store that I visited.  I found this bottle of Glossy Accents by Inkssentials, which is used frequently in scrapbooking for "clear, dimensional embellishment."  I was hoping that I could achieve the same effect with this product as Diamond Glaze claims.

I grabbed the bottle, along with some plain wooden discs and two pieces of scrapbook paper with patterns I liked:


Here's a close-up of the wooden discs that I purchased in the jewelry section of my local Michael's.  You can see what a bargain they are at $1.47 for 12 discs.


I used my drill to make a tiny hole on the top of the disc.  Place a scrap piece of wood under your disc to anchor the disc and give you something to drill into.


Here you can see two discs after they've been drilled.  Make sure to sand off any splinters or rough edges around the hole.


Next, I used a compass to draw a circle the exact size I wanted to cover the disc. I drew the circle on the scrapbook paper and cut out the shape.


A very thin coat of ModPodge was perfect to secure the scrapbook paper to the disc.  You won't need to seal it with a second coat on top of the paper - that's what the Glossy Accents is for.


At this point, your scrapbook paper will be covering the hole that you drilled in the disc.  I pushed four straight pins up through the back of the hole.  This not only poked a hole in the scrapbook paper, but the pins will help keep the hole open when you coat the disc with Glossy Accents.


I used a generous amount of Glossy Accents to coat the top of the disc.  I used the bottle's tip to draw a circle around the outside of the scrapbook paper, and then filled in the circle until I had a smooth surface. Be sure to follow the directions on the bottle.  Shaking the bottle will result in bubbles in the project's surface.  See that pin in the lower right of the photo?  I ended up with two bubbles on my pendant, so I used the pin to work the bubbles to the edge of the Glossy Accents and "pull" them out of the tacky liquid.


You will end up with a smooth milky-looking surface.  It took around 4 hours for my pendant to be dry to the touch and the milky appearance to change to transparent.  Here's the second pendant as it was drying.  Be sure to place your pendants on a flat surface.  The Glossy Accents will run to one side or the other if your project isn't perfectly flat.

I had to support the second pendant in order to get a flat surface. The heads of the straight pins were pushing one side up in the air.


Once the Glossy Accents is dry, carefully pull the pins out from the back.  This will pull any excess Glossy Accents back through the hole so that you'll have a clean surface on the front side of the pendant.


I let the pendants dry for 24 hours to ensure that the surface was completely hardened.  Then I created a bail with a sterling silver jump ring to hang the pendant on a chain.  You could use the pendant as a stand alone accent or dress it up with other beads.  This necklace has red Jasper, Buri nuts and handmade Balinese sterling silver beads.


And now I have 10 wooden discs left.  I'm thinking they would make great magnets for my refrigerator.  Using the same technique as the pendants, you could create monogrammed discs.  Hot glue a round magnet on the back, and you'd have a great way to organize the family's papers in the kitchen.


The Girl CreativeMakingSumo Sweet Stuff Keeping It Simple

Thursday, May 20, 2010

DIY Picnic Table from Knockoff Wood

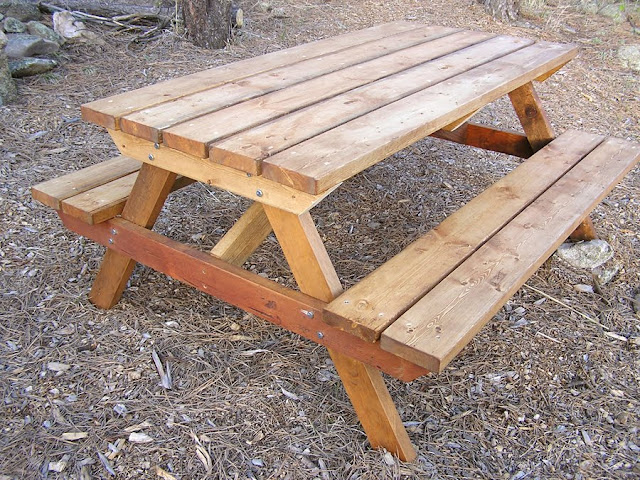
If you follow me on Twitter, you probably caught wind of my latest project.  I was cursing the rains as they were threatening to ruin my perfectly timed two-day project.  And here it is, thanks to the weather, which finally cooperated splendidly.  My first DIY wood working project and my family's new pride and joy - the picnic table:


Over the past few months, I've been so inspired reading all of the plans and scrolling through hundreds of photos on Ana White's blog, Knockoff Wood.  I've also been desperately wanting a picnic table for dining and somewhere to park my computer while my kids are playing in their new clubhouse.  I looked everywhere for an inexpensive (or even reasonably priced table), but I was finding them on Craigslist (used and far away from our home) for $90, and to buy them at a store was almost $200 in certain places.  So, I turned to these plans, generously provided by Ana, and decided I could do-it-myself.

The goal was to build a beautiful table that my whole family could use and to do it for as little money as possible.  Total cost for the project was $62 and that includes stain and hardware.  Here's the story of how it all came together.

Here are all of my boards after I ripped (some of them - more on that later), cut, sanded and stained them. A tip: if you follow Ana's plans, draw your 30 degree angles on the table legs and your 25 degree angles on your center table supports before you cut the boards.  She suggests cutting the boards to 33 inches and 28.5 inches respectively.  However, if you cut the boards to length before cutting the angles, you won't have enough board to cut both parallel angles.  I know this sounds complicated now, but trust me, it will all make sense when you read the plans.  Other than that, Ana's plans were spot on and SO easy to follow.  I can't wait to make another one of her projects.


Then I stained all of the boards with Duckback Transparent Deck Stain in Canyon Brown.  It runs at $16.99/per half-gallon can, and according to my trusty hardware store advisor, it will stain and seal my table while protecting it from the intense Colorado sun.  You can see the difference between the raw pine and the stained board.  I primarily used builder-grade pine purchased at my local hardware store, but I do have some fun (and random) reclaimed wood which I'll describe later.


Here you can see the final finish.  I love the honey tones that it brought out in the pine. 


Remember my goal of maximizing my results while minimizing my dollars spent?  My dad, we'll call him Grandpa Hausfrau, had a couple of VERY old 2"x10" boards lying in his garage.  They were left from the previous owner when my parents moved into their house five years ago.  They were in rough shape, but we saw a diamond in the rough.  We used the table saw, ripped them down to 2"x4" size and sanded until their natural beauty shown through.  The lower support piece (holding up the seat pieces) and the legs are the reclaimed wood.  You can see how the stain highlighted the bumps and bruises and brings the wood back to life. You can also see the remainder of a 2"x6" that is currently supporting the table.  The area that we chose to place the table isn't quite flat, so I still need to move some dirt to make sure the table sits level.  Meanwhile, the board is shoring up the downhill leg.


I learned a ton of new skills in making this project, including countersinking screws.  See how nicely those came out on the seat? Most of these skills were due to the patience and guidance of my dad, who bit his lip when I broke not one, not two - but three of his drillbits while pre-dilling my screw holes.  Thanks for your partnership and patience, Dad!


And after two days of work - one to cut, sand and stain, and one to assemble - I have an amazing picnic table for my family and I've crossed one of the projects off my summer to-do list.  In the background, you can see the boys' clubhouse which still needs the trim finished and painted - yet another project.


Finally, the amazing backdrop that we have in the new picnic area.  We ate at the table tonight, and then sat on the rocks watching nine elk run through the meadow across the street and gorge themselves on grass.  A pretty perfect day, if I do say so myself!


Transformation Thursday

Decor Mamma
Keeping It Simpletoolsareforwomentoo
Related Posts with Thumbnails